
Connecting Google Ads form leads with Gravity Forms is the process of integrating the two platforms to capture and manage leads generated from Google Ads campaigns in a more efficient and streamlined manner.
By setting up a connection between Google Ads and Gravity Forms using a webhook integration, businesses can automate the process of capturing and storing lead data, and use it to generate insights and follow-up actions that can help drive sales and revenue.
Guide to Setting up a Google Ad: A Step-by-Step Walkthrough
To capture leads, you can create a lead form within your Google Ads account and add it to your campaign. It’s important to note that lead forms can be added to various campaign types, including Search, Video, Discovery, and Display campaigns.
It’s important to note that lead forms may not be available in all countries. If your ad is served to an audience in a country where lead forms are not permitted, the audience will not be able to view or interact with the lead form.
To set up a Google Ad and webhook integration, follow these steps:
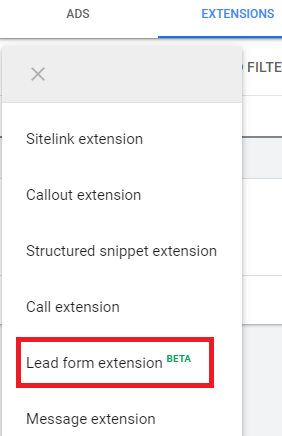
- Log in to your Google Ads account and select the campaign where you want to add the extension.
- Click on “Ads & Extensions” and then select “Extensions.”
- Next, choose “Lead Form Extension” (Beta) and click “Add” to begin the setup process.
You will see the new “Lead Form Extension” (Beta) with a message icon appear next to the phone extension on your search ads. Keep in mind that since this extension is still in Beta, it may undergo changes as Google continues to refine it for the final version.
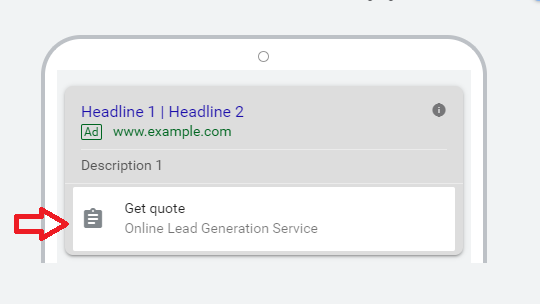
Click on the prompt to open the “Get Quote” form. Then, write a short and attention-grabbing message that encourages users to take action. Make sure to include a clear call-to-action that prompts users to do something specific.
The next step involves creating a form where users can provide their details, which should include the following information:
- Name
- Email address
- Phone number
- Postal code
In addition to the basic fields, you can also add more information and credibility to your ad by filling in the following fields:
- Headline
- Business name
- Description (limited to 200 characters)
- Privacy policy
- Background image
- Call-to-action
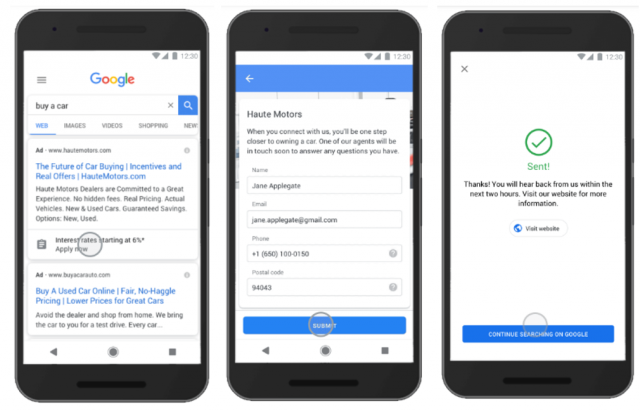
Once the Lead Form Extension is submitted, internet marketers have the following options:
- Redirect users to a thank-you page
- Allow the user to download a file
- Display a thank-you message
Using a Webhook for Google Ads Form Leads with Gravity Forms
To create a Lead Form Extension in Google Ads, you can follow these simple steps:
- Go to your Google Ads account and click on the “Ads & Extensions” tab.
- Click on “Extensions” and then select “Lead Form Extension” from the dropdown menu.
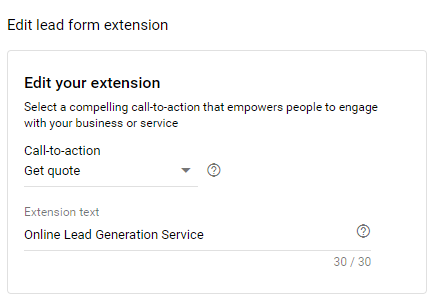
- Choose a call-to-action that is relevant to your business or service, such as “Get Quote.”
- Create a short and engaging message that encourages users to fill out the form.
- Add a headline to your form that encourages users to complete it, such as “Get 20% off on creating your website.” Keep the title under 30 characters.
- Include your business name and a brief description of your product or service (less than 200 characters).
- Add a link to your website’s privacy policy.
- Create a submission message that explains what happens next and what users can expect.
- Choose an appropriate call-to-action, such as a download or a visit to your website’s thank-you page.
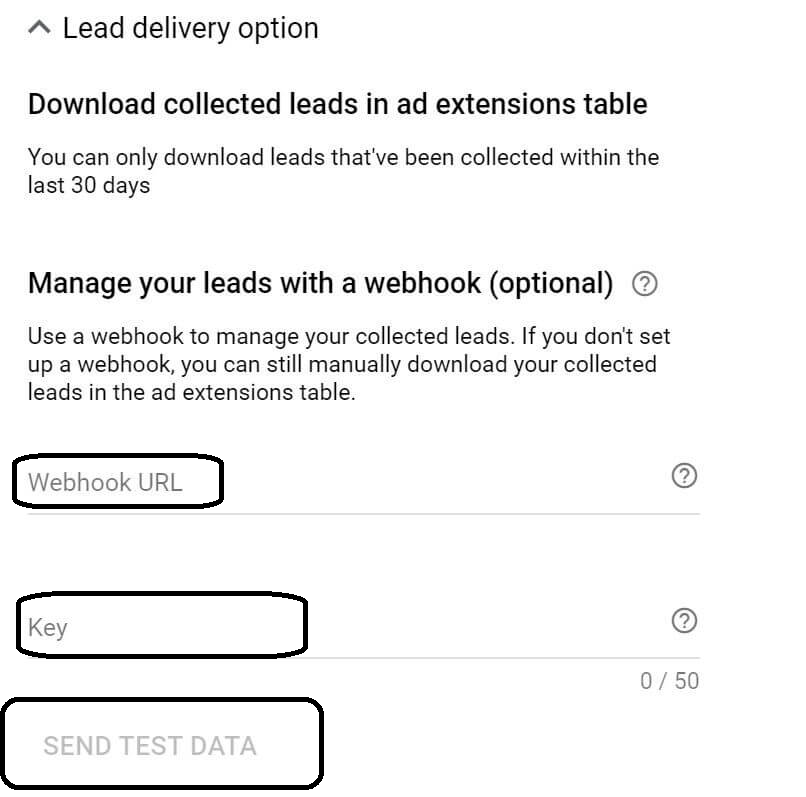
- Click on “Lead Delivery Option” and enter your webhook.php URL (We will implement this URL soon in this article).
- Enter the key you will use in your webhook (We will provide this next in this article).
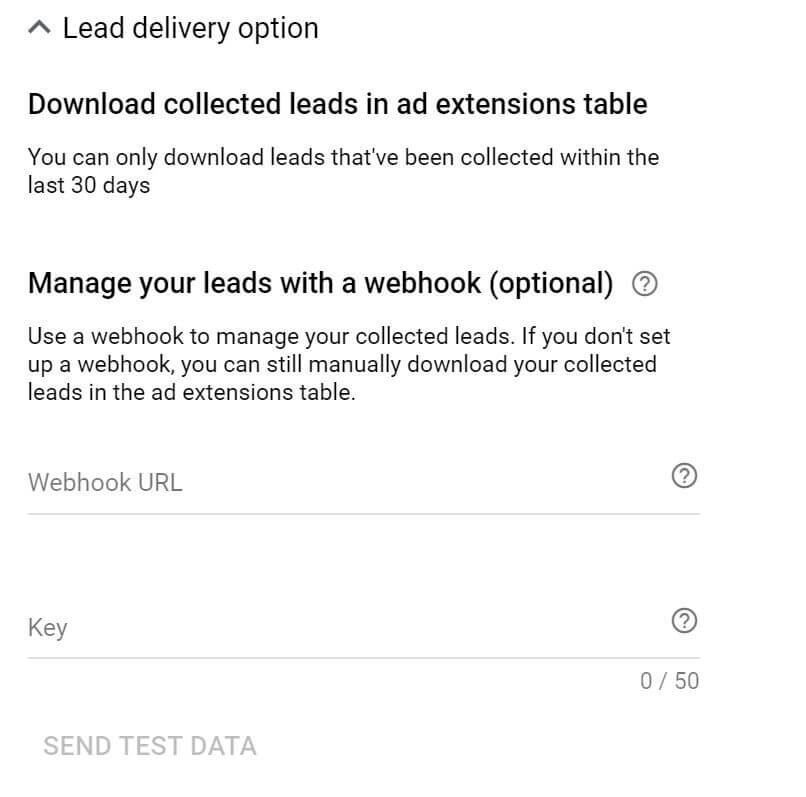
As you can see from the previous steps we need to provide two options the URL of webook and key.
The URL of the webhook is the endpoint where Google Ads will send the lead form data. To ensure the security of the data being transmitted, you can use the key specified in the request to authenticate the source of the data. This way, you can be sure that the data is coming from your Google Ads campaign and not from a malicious source.
Google ads will send this key with each request then you can validate this key with the key you store in your WordPress site.
Register a REST endpoint to act as a webhook
You can follow the rest of tutorial using functions.php file in your theme or by creating custom plugin, let’s process with functions.php in your theme or child theme.
First thing you need is to register your endpoint that will serve as a webhook URL in Google ads campaign.
add_action( 'rest_api_init', 'create_webhook_endpoint' );

function create_webhook_endpoint() {
  register_rest_route( 'webhook/v1', '/data', array(
    'methods' => 'POST',
    'callback' => 'process_webhook_data',
  ) );
}

function process_webhook_data( $request ) {
  // Process the incoming webhook data here
}
This code creates a REST API endpoint at the URL yoursite.com/wp-json/webhook/v1/data that can receive data via a POST request. The process_webhook_data function is the callback function that is called when data is received at this endpoint.
You can customize the URL and the callback function as per your requirements.
We will then implement process_webhook_data function.
function process_webhook_data($request) {
    // Check for Google key
    $google_key = $request->get_param('google_key');
    if($google_key !== 'YourGoogleKey') {
        // If key is invalid, return error
        return new WP_Error('invalid_key', __('Invalid Google key', 'textdomain'), array('status' => 401));
    }

    // Set Gravity Forms form ID.
    $form_id = 1;

    // Set form entry data
    $entry_data = array(
        'input_1' => $request->get_param('name'),
        'input_2' => $request->get_param('email'),
        'input_3' => $request->get_param('phone'),
        'input_4' => $request->get_param('postal_code')
    );

    // Submit form entry
    $entry = GFAPI::submit_form($form_id, $entry_data);

    // Check if submission was successful
    if(is_wp_error($entry)) {
        // If submission failed, return error
        return new WP_Error('submission_failed', __('Form submission failed', 'textdomain'), array('status' => 500));
    }

    // If submission was successful, return success message
    return 'Form submission successful';
}
GFAPI::submit_form() is a function provided by the Gravity Forms plugin in WordPress, which allows developers to programmatically create new form entries in Gravity Forms.
The function takes two parameters:
$form_id(integer) – the ID of the Gravity Form that the entry should be created for.$entry(array) – an associative array that maps field name to values. This is essentially the data that will be submitted to the form. The keys of the array should correspond to the field name of the form, you can get these names by previewing the form you have in gravity form and inspecting the name attribute of each input field.
‘YourGoogleKey’ is the same key you have used in you campaign configuration, you can store in WordPress options in retrieve above using get_option function.
$form_id is the form you want to send these data to in you gravity form we suppose here its ID is 1.
function process_webhook_data($request) {
    // Retrieve the Google Key from the WordPress database
    $google_key = get_option('google_key');

    // Check if the request contains the correct Google Key
    if ($google_key !== $request['google_key']) {
        return new WP_Error('invalid_key', 'Invalid Google Key', array('status' => 401));
    }
  	// ...
}
That’s all, now you test using “SEND TEST DATA” button in Lead delivery option in your Google Ads, after enter you URL and key from the previous implementation.
This should create a new entry in you gravity forms with form ID=1 (in the above example ID is 1, it can be differ in your case).